From Novice to Pro: Master Integrating APIs with Redux Toolkit: Level 4
Master API integration with Redux Toolkit. Go from novice to pro with practical examples, best practices, and solutions to common challenges.

Turjoy • August 5, 2025
The goal in this article is to impart the techniques of handling APIs in redux toolkit.
How to deal with APIs.
How to structure an API request and pass modified data to reducer for redux-toolkit.
What role Promises play in the process.
If you are not aware of redux toolkit basics you can explore the [previous lesson](previous lesson).
Use [Staring Code](Staring Code) to code along.
[Final Code](Final Code) is there for reference.
Firebase setup
First you need the APIs.
Firebase realtime db provides APIs for free to play with.
The steps are as follows:
- Go to firebase console
- Create a project
- Enable realtime db (with production setup/test setup).
- Update the realtime db rules
{
  "rules": {
    ".read": true,
    ".write": true
  }
}
Change these rules to default after you are done
Adding the config
Add a file ./src/constants/baseUrl.tsx.
Copy the root Url (say https://#########.asia-southeast1.firebasedatabase.app/) from Realtime DB.
Add this to the file.
const BaseURL = "https://://#########.asia-southeast1.firebasedatabase.app";
export default BaseURL;
REST APIs
REST is a set of rules for designing web services that makes them work well together.
Firebase provides direct access to the real-time database through REST APIs.
Here's the documentation.
We are gonna use GET, POST, PATCH and DELETE methods.
API Integration
The flow is like...
- A custom action gets response from API.
- Does data manipulation on the response if required.
- Passes the result as a resolution of a promise.
- The reducer detects the data if promise resolves.
Don't worry, terms will be clearer if you got doubts.
createAsyncThunk:
This function takes two arguments:
- Text representing an action type
- Function that returns a promise (performs asynchronous work)
The reducer accepts the function and decides state update.
Promises in JS
Some times an operation might take sometime to complete.
A Promise is a placeholder for the future result of that operation.
It tells your code to wait for the operation to finish.
Then handle the result (success or error).
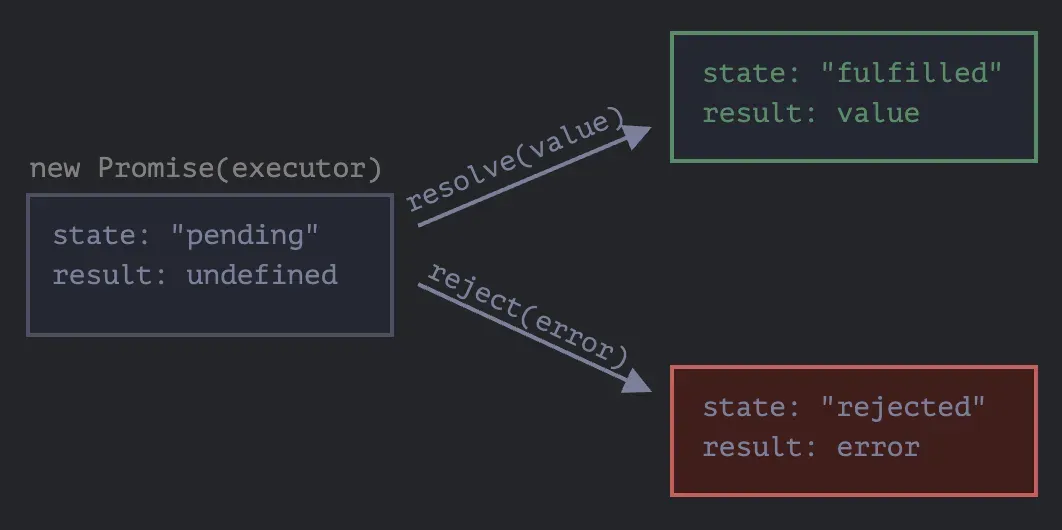
So, a Promise is in one of these states:
- pending: initial state, neither fulfilled nor rejected.
- fulfilled: meaning that the operation was completed successfully.
- rejected: meaning that the operation failed
1. Basic Promise Creation:
 Using the Promise constructor to create a simple promise.
const basicPromise = new Promise((resolve, reject) => {
  // Simulating an asynchronous operation
  const success = true;

  if (success) {
    resolve("Operation successful");
  } else {
    reject("Operation failed");
  }
});
2. Using .then() and .catch():
Chaining .then() for success and .catch() for error handling.
basicPromise
  .then((result) => {
    console.log(result); // Output: Operation successful
  })
  .catch((error) => {
    console.error(error); // Output: Operation failed
  });
3. Using async/await:
Using the async function along with await to work with promises in a more synchronous-looking style.
async function asyncOperation() {
  try {
    const result = await basicPromise;
    console.log(result); // Output: Operation successful
  } catch (error) {
    console.error(error); // Output: Operation failed
  }
}

asyncOperation();
3. Preparing data for reducers
We define the resolve and reject types.
We then nest two promises.
We control the resolve and reject return values.
The reducer does the promise resolution to get the values.
For example, the action for fetching all todos.
We also pass the action type string 'todo/fetch'.
export const fetchTodos = createAsyncThunk("todo/fetch", async () => {
  try {
    const response = await fetch(`${BaseURL}/todos.json`);

    if (!response.ok) {
      return Promise.reject(`HTTP error! Status: ${response.status}`);
    }
    const resData = await response.json();
    const arr: TaskResp[] = [];

    for (const key in resData) {
      arr.push({
        id: key,
        description: resData[key].description,
        pending: resData[key].pending,
      });
    }

    return Promise.resolve(arr);
  } catch (error) {
    return Promise.reject(error);
  }
});
Notice that firebase APIs require a .json() at the end of the url.
This is specific to firebase.
On the reducer side there is extraReducers object.
The extraReducers provides us with a builder.
The builder has addCase() function to add to the list of reducers.
The reducer can detect the state of the createAsyncThunk function.
It knows whether the action promise is pending, fulfilled or rejected.
It decides accordingly how to update the state.
export const todoSlice = createSlice({
  name: "todo",
  initialState,
  reducers: {},
  extraReducers(builder) {
    builder
      // Fetching
      .addCase(fetchTodos.pending, (state) => {
        state.status = "pending";
      })
      .addCase(fetchTodos.fulfilled, (state, action) => {
        state.status = "success";
        state.data = action.payload;
      })
      .addCase(fetchTodos.rejected, (state: todoSliceState, action) => {
        state.status = "failed";
        state.error = action.error.message;
      });

    // ...
  },
});
Note that the name of the reducer is 'todo'.
And the createAsyncThunk denotes itself as 'todo/fetch'.
This is how actions are named.
API Integration
The flow is like...
- A custom action gets response from API.
- Does data manipulation on the response if required.
- Passes the result as a resolution of a promise.
- The reducer detects the data if promise resolves.
Don't worry, terms will be clearer if you got doubts.
createAsyncThunk:
This function takes two arguments:
- Text representing an action type
- Function that returns a promise (performs asynchronous work)
The reducer accepts the function and decides state update.
Promises in JS
Some times an operation might take sometime to complete.
A Promise is a placeholder for the future result of that operation.
It tells your code to wait for the operation to finish.
Then handle the result (success or error).
So, a Promise is in one of these states:
- pending: initial state, neither fulfilled nor rejected.
- fulfilled: meaning that the operation was completed successfully.
- rejected: meaning that the operation failed
1. Basic Promise Creation:
Using the Promise constructor to create a simple promise.
const basicPromise = new Promise((resolve, reject) => {
  // Simulating an asynchronous operation
  const success = true;

  if (success) {
    resolve("Operation successful");
  } else {
    reject("Operation failed");
  }
});
2. Using .then() and .catch():
Chaining .then() for success and .catch() for error handling.
basicPromise
  .then((result) => {
    console.log(result); // Output: Operation successful
  })
  .catch((error) => {
    console.error(error); // Output: Operation failed
  });
3. Using async/await:
Using the async function along with await to work with promises in a more synchronous-looking style.
async function asyncOperation() {
  try {
    const result = await basicPromise;
    console.log(result); // Output: Operation successful
  } catch (error) {
    console.error(error); // Output: Operation failed
  }
}

asyncOperation();
3. Preparing data for reducers
We define the resolve and reject types.
We then nest two promises.
We control the resolve and reject return values.
The reducer does the promise resolution to get the values.
For example, the action for fetching all todos.
We also pass the action type string 'todo/fetch'.
export const fetchTodos = createAsyncThunk("todo/fetch", async () => {
  try {
    const response = await fetch(`${BaseURL}/todos.json`);

    if (!response.ok) {
      return Promise.reject(`HTTP error! Status: ${response.status}`);
    }
    const resData = await response.json();
    const arr: TaskResp[] = [];

    for (const key in resData) {
      arr.push({
        id: key,
        description: resData[key].description,
        pending: resData[key].pending,
      });
    }

    return Promise.resolve(arr);
  } catch (error) {
    return Promise.reject(error);
  }
});
Notice that firebase APIs require a .json() at the end of the url.
This is specific to firebase.
On the reducer side there is extraReducers object.
The extraReducers provides us with a builder.
The builder has addCase() function to add to the list of reducers.
The reducer can detect the state of the createAsyncThunk function.
It knows whether the action promise is pending, fulfilled or rejected.
It decides accordingly how to update the state.
export const todoSlice = createSlice({
  name: "todo",
  initialState,
  reducers: {},
  extraReducers(builder) {
    builder
      // Fetching
      .addCase(fetchTodos.pending, (state) => {
        state.status = "pending";
      })
      .addCase(fetchTodos.fulfilled, (state, action) => {
        state.status = "success";
        state.data = action.payload;
      })
      .addCase(fetchTodos.rejected, (state: todoSliceState, action) => {
        state.status = "failed";
        state.error = action.error.message;
      });

    // ...
  },
});
Note that the name of the reducer is 'todo'.
And the createAsyncThunk denotes itself as 'todo/fetch'.
This is how actions are named.
Design concepts exploited
The way extraReducers add new reducers follows Builder Design Pattern.
The Builder Pattern:
- Builds complex things step-by-step.
- Keeps building instructions separate.
- Allows creating different things using the same steps.
Next Steps
After you are done understanding, do it yourself making changes in the starting code.
We are able to refactor some code passing less data through components in final code.
Can you also update the components from the starting code?